
Do you remember developing your holiday images? If you are born before the 1980s probably you have taken the perfect prints of your holiday images.
These days with the advent of digital photography most of the holiday images remain stored in hard drive and never to be found again.
In this instant age, we want everything to happen instantly.
We have moved from Analogue to Digital photography. Digital Photography is not only cost effective but also you can see the image that you have taken instantly.
We have moved from Analogue to Digital photography. Digital Photography is not only cost effective but also you can see the image that you have taken instantly.
However, there is a special charm in holding the print of the photograph in your hands.Though we have moved digital still we spend hours editing the pictures to get the perfect retro look.
Fuji has successfully bridged the digital divide with the introduction of Fuji Instax series of cameras. These Instax cameras not only pops up the image instantly but also has a retro look. Do you remember the look of old Polaroid images, well Fuji has recreated the magic but with the use of a completely different technology. The pictures may have the similar look and feel but Don't confuse Instax with Polaroid as technologically they are poles apart.
I have been using Instax Mini 8 camera for a few days now and must say I am loving it. I don't have to wait to go back home and print my holiday images, now I can get it instantly.Fuji Instax pops out lovely credit card size images with a vintage feel to it.
Sometimes I meet an interesting person during my travel and I want to gift them something which they can keep with them.What do I do? I click an Instax photograph and hand it over to the person.Memory preserved.
The Instax Mini 8 Camera
Since the camera has a fixed Lense and what you see through the viewfinder is not exactly what you get, taking pictures using Instax is fun as you don't know what output you will get, until the time the photograph develops. I can assure you once the image develops you will be pleasantly surprised and happy with the output.
I will briefly touch upon the camera and will share Tips on how to use the camera in detail.
The Instax Mini 8 is a very basic camera it doesn't have many options to control exposures.
The below image shows the various parts of the camera.
The Instax Mini 8 is a very basic camera it doesn't have many options to control exposures.
The below image shows the various parts of the camera.

Since its, a very basic camera taking photographs can be really tricky.
5 Tips to take beautiful pictures on Instax Mini 8
Be prepared to waste few films in the beginning before you start taking good photographs with Instax Mini 8. I almost wasted one roll of film i.e. 10shots before I learnt how to take good photographs on Instax Mini 8.
I will share few tips which I learnt while wasting a roll of film.
1.Remember: What you see is not what you get
This happens due to something called as parallax error as the Lens and the Viewfinder are not aligned in the same line. If you see the above image you can see that the viewfinder is aligned towards the left of the lens.Don't worry you don't have to deal with it always.
Due to this issue, I wasted few shots.

There is a way on how to tackle the Parallax error.Move your camera to the Right and then Up to remove the parallax error.

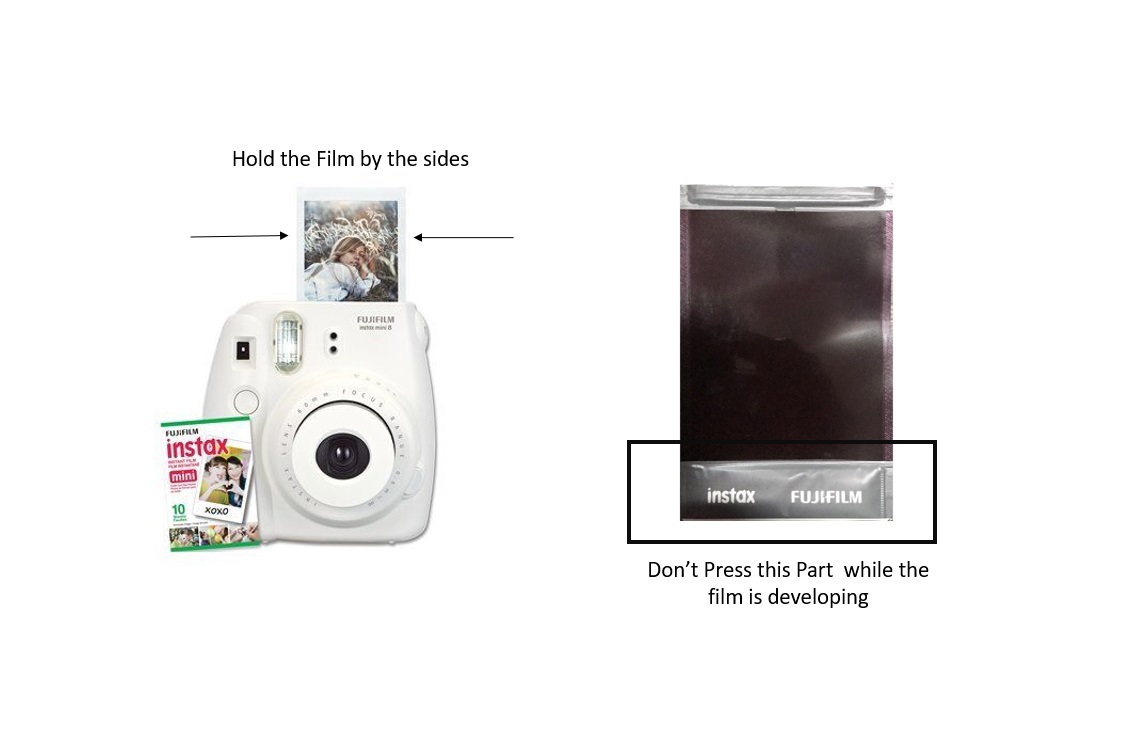
2. Handling the Film
One can hold the film whichever way one wants. The only precaution one needs to take is not to open the film slot once the film is loaded in the camera to avoid being exposed to light.
You need to be a bit cautious on how to handle the film or else you can easily ruin a good picture. Probably every wrong thing that could happen with Instax Mini 8 has happened with me.This has helped me to learn a lot about how to take good pictures with Instax Mini 8.

The blotch you see in the picture above is due to how I handled the film when it popped out.
When the film comes out handle the film from the both the edges at the side and don't press anywhere on the back or front of the film.
The below picture shows how to handle the film and where not to press as the below black strip holds the ink and pressing it would lead to leaking of the ink which happened in the above picture.
3. Control exposures in the Instax Mini 8
You can't control your exposures much, however, you can make the photographs lighter or darker.
This is extremely easy to do in Instax Mini 8.
If you want to make the photograph look Lighter move the dial towards the Home Icon and if you want it to look Softer images move the dial towards the Hi-Key Icon.

4. Developing the Film
It usually takes a minute to develop the film and a maximum of two minutes for the sharp images and colors and shaking will not ruin the photograph.
This is not a polaroid but an Instax Camera hence there is no need to shake the film.
As soon as the photograph pops out, keep it in a dark place like inside your bag or inside the pocket. The darker it is the better is the development of the photograph.

5. Maintain Distance
A word of caution don't try macro photography with Instax Mini 8 or else your photos will come out blurry. The minimum focusing distance for Instax Mini 8 is 2 feet anything closure than this will turn out to be blurry. For best results, the object that you are clicking should be between 2 feet to 12 feet distance. If you are a landscape photographer then using Instax Mini 8 will not be of much help as though it can focusup too infinity the objects in the distance will not be very clear.
Instax Mini 8 is absolutely fun to use , provided you keep the above nuances in mind.Possibilities with Instax Mini 8 is limitless.
Next time you are going on a holiday don't forget to carry Instax Mini 8 with you and share the joy of instant photography with fellow travellers.
Stay Instaxicated !!!


No comments:
Post a Comment